
| Tell me when this page is updated |
| Tell me when this page is updated |
Note: The information on this page is now very out of date. In fact, I no longer grow my own sprouts. While I believe sprouts to be extremely nutritious, the amount of time and effort required to grow them is substantial, even using the efficient techniques described below. In my effort to reduce the impact food has on my life, I have greatly streamlined my diet. This has included eliminating home-grown sprouts. I do continue to eat about 4oz of store bought broccoli sprouts per week.
Here are some other modifications to my sprouting technique that I implemented prior to eliminating home-grown sprouts completely:
|
I no longer harvest sprouts from my sprout farm once per week. Instead I harvest daily, to both increase yield and improve the freshness of the sprouts I grow. | |
|
I no longer grow and juice wheatgrass - having found the benefits for me do not outweigh the effort require. I just grow and eat more sprouts instead! | |
|
I no longer grow adzuki, lentil or pea sprouts. They are a bit too high in calories for me. I just grow and eat more leafy green sprouts! | |
|
I don't find it necessary to fertilize or disinfect my spouts as they are growing, as implied below. The yield is virtually identical without these two steps. | |
|
I don't soak my seeds prior to planting as implied below. Again, the yield is about the same either way. |
I hope you find the information provided below useful, and happy sprouting!
It can be argued that calorie-for-calorie,
sprouts are the healthiest food on earth.
For example, a recent John’s Hopkins study
showed that broccoli sprouts have 10-50 times the cancer-fighting agent in
mature broccoli, which itself is one of the best cancer fighting foods. For more
general information about just how remarkably nutritious sprouts are, look here.
Having recognized the tremendous benefits of sprouting from a health/nutrition perspective, but at the same time having determined through personal experience that manual sprouting can be quite time consuming when done on a large scale, I recently set up what I affectionately like to call my “Automatic Sprout Farm” based on plans available at http://www.eat-sprouts.com/. I’ve created this page to document:
· Basic components of the sprout farm
· The sprouts I grow each week, and how much I’m able to grow with my sprout farm
Bottom line: I highly recommend sprouting in general, and the automatic sprouting apparatus available at http://www.eat-sprouts.com/ makes it tremendously easier than manual sprouting methods. If interested, please don’t ask me for details on how to build your own automatic sprouter. Instead, purchase the plans for $9.95 (or a kit or a pre-assembled sprouter) from its developer, Val Archer at the above web page. There is not enough information on my web page to build your own automatic sprouter.
Please don’t be
intimidated by the sophistication of my sprouting setup. I have personally
recognized the huge benefits of sprouting and have chosen to devote considerable
upfront resources (time and money) in order to ensure a continual large supply
of sprouts for my diet with virtually no ongoing effort. For anyone who wants to try out
sprouting on a small scale with very little upfront cost and relatively little
ongoing effort, I highly recommend purchasing a small amount of seeds and the
Easy Sprout manual sprouter, from http://www.sproutpeople.com/. The Easy Sprout sprouter was how I “got
my feet wet” with sprouting. It is about the size of a super-size soft drink
cup, and with it you can grow a few servings of sprouts per week, spending only
a minute or two a day tending to them.
The good folks at Sproutpeople even sell combination kits that include
the Easy Sprout sprouter and a variety seeds in a single bundle for under $30.
So give it a try, and once you
discover the wonders of sprouting, then you can think about upgrading to a
system like my Sprout Farm.
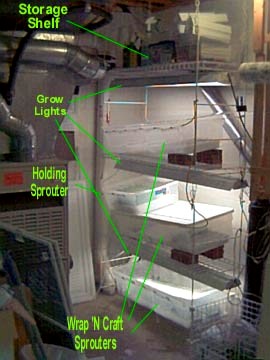
In total, I estimate I’ve spent about $950 equipping my Automatic Sprout Farm – but don’t let the price tag scare you. I grow A LOT of sprouts, and I’ve added quite a few embellishments to the four core sprouters I operate – see methods, tips and tricks section for details. The parts for a single sprouters (of which I have four) can be purchased for under $100. At the heart of my automatic sprout farm are four containers in which the sprouts grow. They are stacked on top of each other on shelves that hang from the rafters in my laundry room. Together, the four containers provide over 1500 in2 (nearly 10,000 cm2) of growing area. Each of the four containers is equipped with grow lights to “green” the sprouts, and misting nozzles to water the sprouts. The nozzles are connected to the spigot in my laundry room, and a timer, so that the sprouts are gently misted six times per day, very much like the produce in a grocery store. This frequent automatic misting totally eliminates the need for manual rinsing/watering, which I found became a real chore when trying to grow a lot of sprouts. Literally, all I have to do is sprinkle seeds in the sprouter, and 7 to 14 days later (depending on the type of seed) I’m ready to harvest another crop of luscious sprouts.
I have devoted substantial time and effort to refining my planting and harvesting technique to maximize the yield and minimize the effort associated with sprouting with my automatic sprout farm. As a preface, I travel quite a bit, so I’m often not at home for much of the week to tend to my sprouts. Therefore I have optimized my planting/harvesting schedule to require attention only one day per week (for me typically Saturday). The activities involved with processing my sprouts on Saturday include:
· Rinsing of sprouts, to clean and remove hulls/unsprouted seeds
· Washing of sprout containers and trays with bleach to prevent mold
· Setting sprouts out to dry for about 12 hours
· Reseeding trays for next weeks harvest
· Setting newly seeded trays in sprout containers to soak for 12 hours
Together these activities require approximately 2 hours, once per week, which I consider to be a small price to pay for such a bountiful harvest.
After harvesting the fully-grown sprouts, I pack my sprouts in individual plastic bags along with other salad veggies to be eaten during the week (yes, I bring my salads with me to eat when I’m traveling). The same is true for the grass mixture I grow. I harvest seven trays for the week on Saturday and pack it into seven plastic bags (roots and all). Each morning I open one of the bags, snip the blades of grass from the roots, and juice the grass in my Green Life juicer. If I’m traveling and won’t have my juicer available, I juice enough bags of grass before I leave and freeze them for consumption during my trip.
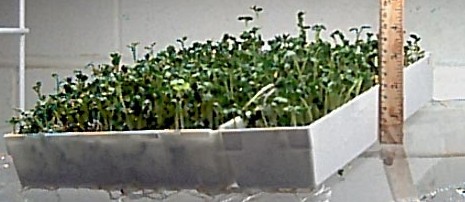
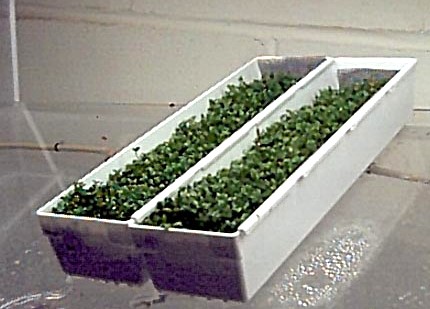
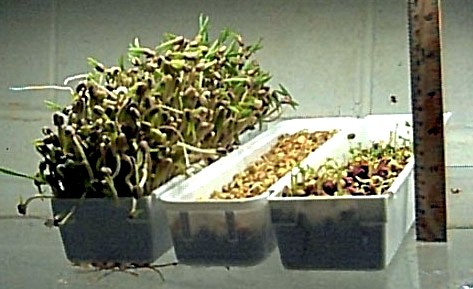
Below is a table of sprouts that I grow each week. Sprouts are held in individual 3” wide by 12” long by 2” high trays within the four containers. Between the four containers, my sprout farm has room for 42 such trays. The meanings of each column are given below the table.
Seed Type |
Tbsp/tray |
g/tray |
trays/wk |
g/wk |
Seed Cost/kg |
Seed Cost/wk |
Days to Grow |
Yield/wk |
|
3 |
38 |
7 |
266 |
$2.50 |
$0.67 |
10-14 |
315 | |
|
1.5 |
17 |
4 |
68 |
$12.00 |
$0.82 |
7 |
400 | |
|
1.5 |
18 |
4 |
72 |
$3.50 |
$0.25 |
7 |
335 | |
|
1 |
13 |
3 |
39 |
$5.00 |
$0.20 |
7 |
375 | |
|
4 |
24 |
5 |
120 |
$3.85 |
$0.46 |
14-18 |
650 | |
|
2 |
25 |
4 |
100 |
$4.50 |
$0.45 |
7 |
700 | |
|
8 |
100 |
1 |
100 |
$3.50 |
$0.35 |
7 |
475 | |
|
4 |
50 |
1 |
62.5 |
$4.84 |
$0.24 |
7 |
200 | |
|
4 |
100 |
0.5 |
62.5 |
$3.30 |
$0.17 |
7 |
200 | |
|
4 |
100 |
0.5 |
62.5 |
$2.75 |
$0.14 |
7 |
200 | |
|
Totals |
|
485 |
30 |
915 |
|
$3.73 |
|
3535 |
Column Descriptions:
·
Seed Type – type of seed I plant. Lines with multiple types represent
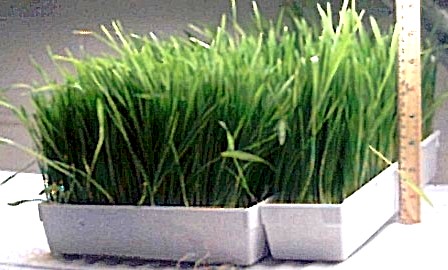
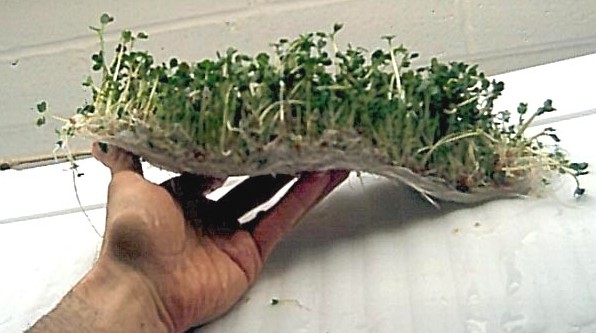
trays with a combination of seeds. Click on the highlighted seed types to see
pictures of the fully-grown sprouts, about to be harvested.
·
Tbsp/tray – tablespoons of each seed type I plant per tray
each week
·
g/tray –
grams of each seed type I plant per tray each week
·
trays/wk – trays of each seed type I plant per tray each
week
·
g/wk – total grams of each seed type I plant each
week
·
Seed Cost/kg – cost of seeds per kilogram
·
Seed Cost/wk – cost of seeds I plant each week
· Days to Grow – number of days I allow each seed type to grow.
·
Yield/wk – How many grams of each sprout (except for grass
– see note) do I harvest each week
Notes on Table:
· I purchase (nearly) all my sprouting seeds from Mumm’s. The prices are in US$ from Mumm’s as of 5/1/01.
· You might wonder why I only harvest 30 trays per week, when my four sprout containers have room for 42 trays. The reason is that two of the sprouts (the grass mixture and sunflowers) take over one week to grow. So the extra 12 trays are devoted to next week’s harvest of grasses and sunflowers.
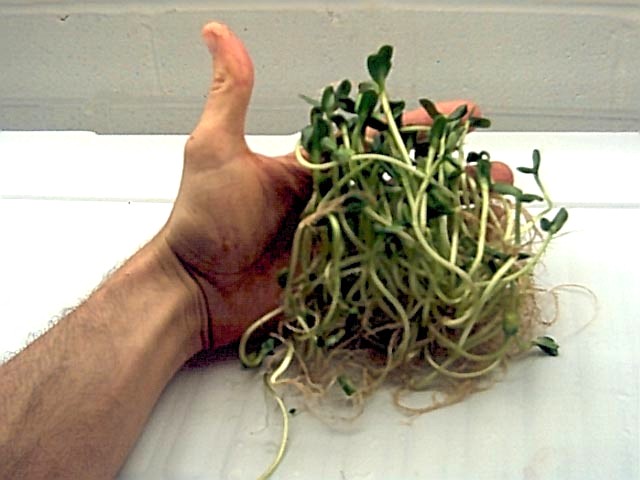
· All sprouts except the grass mixture and sunflowers are harvested after one week of growing. Both the grass and the sunflowers could be harvested after about 10 days. If I’m not home during the week, I let them both grow for a full two weeks and harvest them on the weekend. If I am home, I typically harvested (and refrigerate) the grass after about 10 days, and in their place plant a fresh crop of sunflowers. I find the grass starts to get a little too mature by 14 days so harvesting at 10 days is good. In contrast, the sunflowers benefit from a few days extra growing (e.g. they are larger, and more of them have shed their hulls).
·
I plant almost 1000g (2lbs) of seeds per week at a cost of a
little less than $4, for an average of about $2/lb for the seeds.
·
The yield/wk for all seed types except the grass mixture reflects
the weight (in g) of the sprouts I grow.
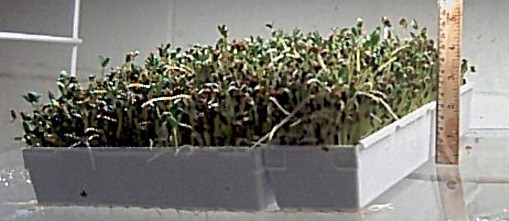
I actually end up trimming the thick roots off the radish/mustard mix,
and don’t use the thick roots of the grass mixture, but for the rest, I eat the
whole sprout. The numbers reflect
this.
·
The yield for the grass mixture (3 parts wheat, 1 part rye, 1 part
barley, 1 part kamut) reflects the number of grams of juice I get from my
harvest. In more detail, the 3Tbsp
(38g) of the grass seed mixture I plant per tray grows to about 225g of grass in
10-14 days. Of this, about 150g is
root matter, which I trim off and discard.
The remaining 75g are the tender blades of grass. These I juice in my Green Life juicer to
yield about 45g (1.5oz) of juice. I
grow seven such trays per week (one for each day), so my yield is 7 * 45g = 315g
of grass juice per week.
·
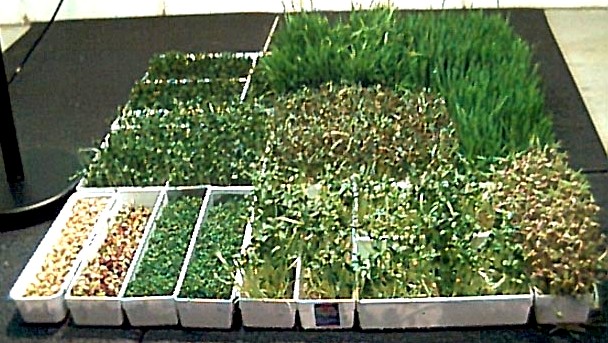
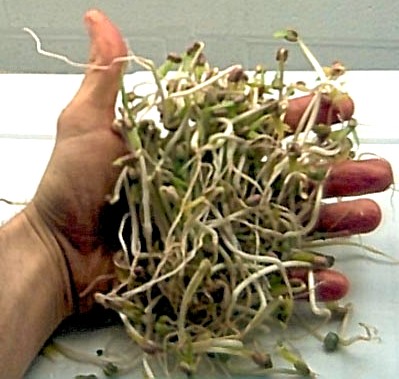
The total yield reflects the weight of all sprouts except the
grass mixture. 3535g translates
into nearly 8 lbs of sprouts that I harvest each week, plus enough grass to
yield 1.5oz of juice. Click here to
see a week’s full harvest of 30 trays.
And yes, I do consume all these sprouts in a week (more than 1lb per
day).
·
The total cost of my sprouting operation is about $4/week for
seeds, plus less than another $1 for water, electricity, fertilizer, hydrogen
peroxide. For $5/week, I’m able to
grow about 8lbs of sprouts for an average cost of about 60 cents per pound of
sprouts, plus enough grass to yield 1.5oz of grass juice per day.
This section is meant for people who are already into sprouting, and particularly those who already own the automatic sprouter available from http://www.eat-sprouts.com/. If is filled with useful tips and tricks I’ve learned through experimentation with my automatic sprout farm.
The biggest and most important trick I’ve learned to make relatively large scale sprout growing possible for me is once per week sprout tending using a fully automated sprouting system. By harvesting and reseeding my sprouts one day per week, and then refrigerating them to be eaten throughout the week, I find the impact of sprouting on my family life is greatly diminished. Before I had my automatic sprout farm, I used to sprout by hand. This required twice daily rinsing, which took a total of about 20 minutes, even though I was growing only about 2lbs of sprouts per week (compared with 8 lbs now). Even worse, when I was traveling during the week, my wife would have to perform the rinsing ritual, something she was not too happy about. Now, I can plant my sprouts on Saturday, and not worry about them again until the following Saturday. One might ask how fresh the sprouts stay in the refrigerator. My answer is that with my refrigerator set at the right temperature (around 35 deg F), I can’t tell the difference between sprouts fresh from the sprouter and sprouts that have been refrigerated for a week.
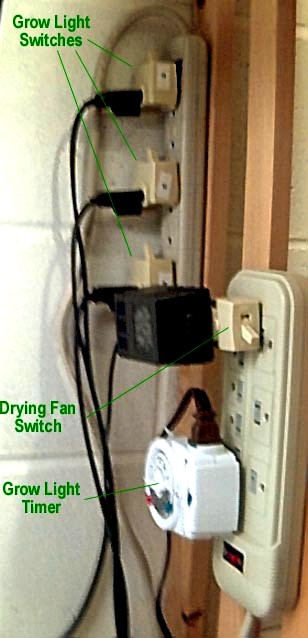
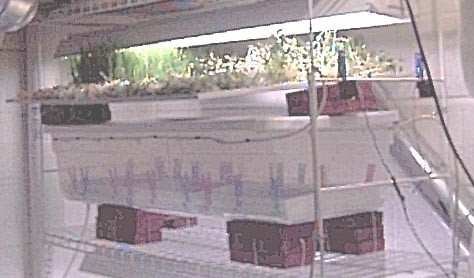
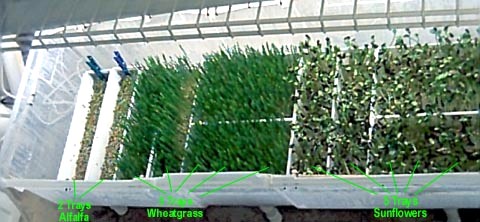
I have my automatic sprout farm set up in my basement laundry room, which is equipped with a ready source of water (for the washing machine) and a drain hole in the floor, to which I run the drain tubes from my sprout containers. The thing that is missing from my sprout farm locale is natural light. To compensate, and allow my sprouts to “green up”, I’ve installed grow lights over each of the sprout containers. These grow lights are hooked up to individual switches and a timer. The timer allows me to simulate the day/night cycle. I have the lights on from 4:30am to 10pm. The individual switches allow me to turn of the grow lights over individual sprout containers when the sprouts in them are just seeds, and therefore do not yet need light. I also have pieces of clear lexan for sprout container covers, allowing my sprouts to receive maximum exposure to the grow lights. One of the clear lexan covers can be seen on the bottom sprouter here.
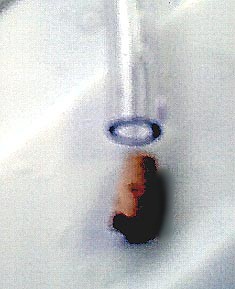
One concern many people have with sprouts is mold and salmonella. The risk of these can be greatly reduced by growing your own sprouts from organic seeds (e.g. from Mumm’s, where I buy my seeds). To further reduce the risk, I’ve implemented an addition to my automatic sprout farm which allows my to automatically disinfect (as well as fertilize) my sprouts every time they are misted. The solution involves adding a Miracle Gro-brand hose-end sprayer into the water feed line of my sprout farm, right after the water filter, as seen in this picture. This sprayer mixes in a small amount of the liquid from its reservoir into the water being used to mist my sprouts. I’m currently using this setup to mist my sprouts with a combination of hydrogen peroxide (for disinfecting purposes) and Miracle Gro plant fertilizer (to help them grow quickly and green up nicely). I’m not certain the fertilizer is doing much for the sprouts, since I’ve heard from various sources that sprouts don’t absorb nutrients through their roots at such a young age. However the makers of Miracle Gro claim that plants absorb their product through the leaves as well as the roots, so I suspect my sprouts are absorbing some of the nutrients this way. Besides, it is trivial to add the fertilizer to the reservoir, and costs only pennies per week – so I figure it can’t hurt. The only complicating factor is that a few ounces of water drain from the hose-end spray at the end of each misting cycle. To catch this water, I’ve added a bucket below the hose-end sprayer (see picture) with a hole in the bottom and a drain hose leading to my laundry room floor drain hole.
NOTE: I’m currently experimenting with liquid kelp fertilizer from http://www.seaspray.com/, in place of the Miracle Gro fertilizer, which some people have expressed reservations about.
As can be seen in this picture, I’ve added individual water switch valves for each of my sprout containers, instead of daisy chaining them all together in the standard configuration. This allows me to turn on/off misting of each sprout container individually. Why would I want to do this, since each of my sprout containers always have sprouts growing in them? The answer is that at the start of my growing cycle (on Saturday), I soak the newly planted sprout seeds (in the sprout containers) for 12 hours – see detailed discussion of this below. Having individual water switches allows my to turn off the water to those sprout containers in which seeds are soaking, to keep those containers from filling up with water during the soak period!
In this same picture you’ll notice a black hose attached to one of the switches labeled “Soak/Wash Hose”. This is a six-foot section of garden hose (actually high pressure washing machine hose), with a brass garden spray nozzle on the end (not shown). I find this extremely handy for washing out my sprout containers on harvest day, and for quickly filling the sprout containers with an inch of water before setting new seeds in them to soak (see below for discussion of soaking).
As you may have realized, I’m interested in maximizing my sprout yield in the limited (7 day) “growing season” I have to work with. One way I’ve found to do this is to implement a modified version of a technique used by almost all other people who sprout, except people who use this automatic sprouter – namely initial soaking of the seeds to encourage rapid germination. The growing advice Val gives for owners of the automatic sprouter is to simply place dry seeds in the sprouters, and let the frequent misting take care of getting the seeds to germinate. This is certainly very easy, and it does work (i.e. pre-soaking of seeds is not required). However I’ve found you get more rapid germination, and therefore a bigger crop at the end of the week, if you soak the seeds first. And I’m found an easy way to do it that involves no additional handling of the seeds. Here is how it works:
· Level the sprouter to compensate for its normal tilt – we want it flat during the soaking process – I use bricks.
· Insert a small cork (available at your local hardware store) into the end of the ¼” drain tube from each of your sprout containers in which new seeds are to be planted.
· Fill the sprout container with 1” of water – the cork will keep the water from draining out.
· Sprinkle the seeds into the trays as usual
· Place the trays into the partially water-filled sprout container
· Pat down seeds to make sure they are in good contact with the water – most of them should sink.
· Make sure sunflower seeds are submerged by placing another tray on top of trays with sunflowers and weighing it down
· Turn off the water supply switch to the sprout container too keep it from filling up during the soak period!
· 12 hours later, simply remove the cork and the bricks to allow the water to drain from the sprout container.
· Turn the water supply to the sprout container back on, and your germinated seeds are ready to go!
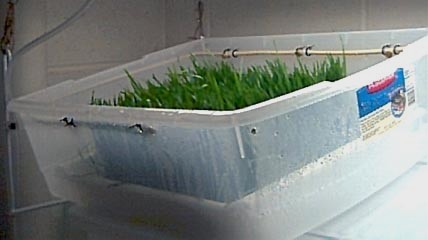
After purchasing one pre-assembled sprouter from http://www.eat-sprouts.com/, and then building two more copies myself, I found I had five misting nozzles left over. In order to increase my sprouting capacity, I used them to build a small sprouter out of a Rubbermaid container (model #4632, 1’11” x 1’5” x 7.3”). The container is perfectly sized hold 6 12”x3” trays (half the capacity of the stock “Wrap ‘N Craft”). It is a lot smaller than the Sterilite (which wouldn't fit on my shelves) but still fits 6 12"x3"x2" trays (not the 5 3"x15"x2" trays the Sterilite holds). You get nearly exactly the same growing area (216 sq. in. vs. 225 sq. in.) between the two boxes, but I think the form factor of the Rubbermaid 4632 is a lot easier to fit in (plus the trays are then interchangeable between my Wrap N Crafts and my "holding sprouter"). The height is a little short (7.3” vs. 9” for the Sterilite), but as long as I'm not growing Wheatgrass in it, the 7.3" height is fine. When I do grow my grass mixture in this sprouter, the grass just touches the lid when it is ready to harvest. Mature sunflower sprouts are just shy of the lid. I set this smaller sprouter (which I also call my “holding sprouter” for historical reasons) on top of one of my larger Wrap ‘N Craft sprout containers, as can be seen here.
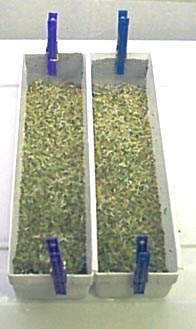
On the http://www.eat-sprouts.com/ web page, Val suggests using a barrier of larger seeds to prevent smaller seeds from clogging the drain holes in the trays. Since I’m planting 30 trays of new seeds each week, I found this solution to be much too time consuming. Instead, I use small pieces of standard window screen, held in place with clothes pins, to form a barrier over the drain holes. These screens and clothes pins can be seen here, preventing the small seeds of alfalfa and clover from clogging the drain holes of two trays. If you are around, it helps to remove the screens after a couple days (once the seeds have germinated) to prevent the roots of the sprouts from getting too entwined in the screen. But if not, it is pretty easy at harvest time to rinse off the few sprouts that do get entwined in the screens.
Speaking of screens, at harvest time, the moist sprouts must be allowed to dry out before placing them in the refrigerator. I’ve developed a method for this, shown here just below the grow light. It involves removing the sprouts from the growing trays and placing them on standard mesh window screen, and elevating the screen (with bricks) to allow air circulation below the sprouts and the allow water to drip down from the roots. You can also see two small black squares towards the left side of the image, held in place with clothes pins. These are small 12V fans available at Radio Shack that are typically used to cool electronic equipment. I use these to increase the air circulation below my sprouts, to expedite the drying process. However these fans aren’t strictly necessary – the sprouts will dry just fine naturally if given a little extra time.
Contrary to what is published on the http://www.eat-sprouts.com/ web page, the standard “Wrap ‘N Craft” container will hold 12 of the 12”x3” trays, not 11, as shown here. This increased the amount of sprouts I can grow – always a good thing.
I cleaned my local Wal-Mart out of 12”x3” trays and needed more. As can be seen here, I found that two of the Rubbermaid 6”x9” trays can be substituted perfectly for three of the 12”x3” trays.